
적절한 자료구조를 사용하면 리액트 코드를 깔끔하게 짤 수 있습니다.
적절한 자료구조를 활용하여 로직을 리팩토링하여 애플리케이션의 확장성을 향상시켜 봅시다.
해당 게시물의 목표는 다음과 같습니다.
- 코드를 더 쉽게 읽고 유지보수 쉽게 하기
- 버그에 덜 취약한 코드 만들기
- 코드의 복잡성 제거하기
- 애플리케이션 성능 향상시키기
Map : 해시테이블
(해시) 맵, 해시 테이블 또는 딕셔너리는 기본적으로 키-값 저장소입니다.
JavaScript에서 자주 만날 수 있는 다음과 같은 객체입니다.
{
  key1: "value 1",
  key2: "value 2",
  key3: "value 3",
}
네이티브 Map 객체도 존재합니다.
좀 더 성능에 최적화되어 있으므로, 키 기반 검색 시 좋습니다.
아래와 같이 값들만 배열로 만들 수 있습니다.
(value 순서는 키 순서를 유지하지만, 이를 언어 사양 차원에서 보장하지는 않습니다..)
const numericKeys = {
  1: "value-1",
  2: "value-2",
}

console.log(Object.keys(numericKeys))
// ["1", "2"]
사용 사례 : 키(id)로 연관된 객체를 포함한 두 개의 다른 배열

사용자id를 포함한 메세지 객체 배열과
사용자 명과 사용자 id를 포함한 사용자 객체 배열이 있습니다.
저는 메세지에서 사용자 id로 사용자 명을 갖고 오고 싶습니다.
const messages = [
  {
    id: "message-1",
    text: "Hey folks!",
    userId: "user-1"
  },
  {
    id: "message-2",
    text: "Hi",
    userId: "user-2"
  },
  ...
];

const users = [
  {
    id: "user-1",
    name: "Paul"
  },
  {
    id: "user-2",
    name: "Lisa"
  },
  ...
];
아래와 같은 엔트리 배열을 Map의 생성자로 전달하여 Map을 만들 수 있습니다.
[
  ["user-1", "Paul"],
  ["user-2", "Lisa"],
  ...
]
그럼 아래와 같이 코드를 작성할 수 있습니다.
function ChatUsingMap() {
  // 엔트리 배열 [id, name][]
  const namesById = new Map(users.map(({ id, name }) => [id, name]));

  return messages.map(({ id, text, userId }) => (
    <div key={id}>
      <div>{text}</div>
      <div>{namesById.get(userId)}</div>
    </div>
  ));
}
Set : 중복제거 배열
해시테이블과 유사한 Map과 달리 Set은 배열로 생각하는 것이 좋습니다.
Map은 저장소처럼 생각할 수 있으며,
Set은 아이템의 중복을 제거한 결과입니다.
네이티브 객체인 Set(natively supported in JavaScript)도 존재합니다.
const uniqueValues = [...new Set([1, 1, 2, 3, 3])];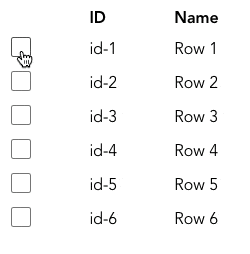
// [1, 2, 3]사용 사례 : 선택된 아이템 추적하기
import { useState } from "react";

const rows = [
  {
    id: "id-1",
    name: "Row 1",
  },
  {
    id: "id-2",
    name: "Row 2",
  },
  ...
];

function TableUsingSet() {
  const [selectedIds, setSelectedIds] = useState(new Set());

  const handleOnChange = (id) => {
    const updatedIdToSelected = new Set(selectedIds);
    if (updatedIdToSelected.has(id)) {
      updatedIdToSelected.delete(id);
    } else {
      updatedIdToSelected.add(id);
    }
    setSelectedIds(updatedIdToSelected);
  };

  return (
    <table>
      <tbody>
        {rows.map(({ id, name }) => (
          <tr key={id}>
            <td>
              <input
                type="checkbox"
                checked={selectedIds.has(id)}
                onChange={() => handleOnChange(id)}
              />
            </td>
            <td>{id}</td>
            <td>{name}</td>
          </tr>
        ))}
      </tbody>
    </table>
  );
}
이 로직을 배열로 구현하면 코드는 더 짧지만, 정렬 등 로직 확장에 취약하므로 추천하지 않습니다.
const [selectedRows, setSelectedRows] = useState(
  rows.map((row) => ({ selected: false }))
);

const handleOnChange = (index) => {
  const updatedSelectedRows = [...selectedRows];
  updatedSelectedRows[index] = !updatedSelectedRows[index];
  setSelectedRows(updatedSelectedRows);
};
Stack : 히스토리(바로 이전 작업) 추적
- 스택 맨 위에 항목을 추가할 수 있습니다.
- 스택 맨 위의 항목을 제거할 수 있습니다.
이것을 "Last in, first out"(일명 LIFO)이라고 합니다.
Stack을 위한 네이티브 객체는 없으며, 배열로 구현할 수 있습니다.
const stack = [];

// add item to the "top"
stack.push("value");

// remove item from the "top"
const topItem = stack.pop();
사용 사례 : 이전 작업 취소하기
스택은 사용자 행동 추적(history)에 자주 사용됩니다.

아래 코드에서는 history를 스택으로 사용하여, 이전 액션과 영향을 받은 row 데이터를 쌓아둡니다.
undo 시 history에서 pop 하여 이전 상태를 되돌립니다.
React에는 불변 데이터가 필요하므로 Array.push() 및 Array.pop()는 사용할 수는 없습니다.
대신 Array.concat() 및 Array.slice()를 사용합니다.
둘 다 새 배열을 반환하기 때문입니다.
const rows = [
  {
    id: "id-1",
    name: "Row 1"
  },
  {
    id: "id-2",
    name: "Row 2"
  },
  {
    id: "id-3",
    name: "Row 3"
  },
  {
    id: "id-4",
    name: "Row 4"
  },
  {
    id: "id-5",
    name: "Row 5"
  },
  {
    id: "id-6",
    name: "Row 6"
  }
];

function removeRow(state, action) {
  return state.rows.filter(({ id }) => id !== action.id)
}

function addRowAtOriginalIndex(state) {
  const undo = state.history[state.history.length - 1];
  return [
    ...state.rows.slice(0, undo.action.index),
    undo.row,
    ...state.rows.slice(undo.action.index)
  ]
}

// "history" is our stack
const initialState = { rows, history: [] };

function reducer(state, action) {
  switch (action.type) {
    case "remove":
      return {
        rows: removeRow(state, action),
        // Array.concat() as immutable alternative to Array.push()
        history: state.history.concat({
          action,
          row: state.rows[action.index]
        })
      };
    case "undo":
      return {
        rows: addRowAtOriginalIndex(state),
        // Array.slice() as immutable alternative to Array.pope()
        history: state.history.slice(0, -1)
      };
    default:
      throw new Error();
  }
}
Queue : 순서 보장
선입 선출 알고리즘에 사용합니다.
즉 먼저 들어온 아이템이 먼저 처리되어야 할때 사용합니다.
해당 자료구조를 위한 네이티브 객체는 없으며, 배열을 사용합니다.
const queueu = [];

// add item to the "end"
queueu.push("value");

// remove item from the "beginning"
const firstItem = queueu.shift();
사용 사례 : 알림 순서대로 없애기
먼저 초대한 사용자 이름이 먼저 나타난 뒤 먼저 사라집니다.

import { faker } from "@faker-js/faker";
import { useState } from "react";

function ButtonAddingNotifications() {
  const [notifications, setNotifications] = useState([]);

  const addNotification = () => {
    setNotifications((previous) => {
      // use Array.concat() as immutable alternative to Array.push()
      return previous.concat(`${faker.name.firstName()} joined!`);
    });
    setTimeout(() => {
      // use Array.slice() as immutable alternative to Array.shift()
      setNotifications((previous) => previous.slice(1));
    }, 1000);
  };

  return (
    <>
      <button onClick={() => addNotification()}>
        Invite User To Community
      </button>

      <aside>
        {notifications.map((message, index) => (
          <p key={index}>{message}</p>
        ))}
      </aside>
    </>
  );
}
Toast 구현시 이를 응용할 수 있을 것 같네요.
Tree : 재귀 구조 데이터
트리는 중첩 데이터 구조입니다.
유사한 자료구조가 중첩되어 있으며, 부모는 자식 데이터를 포함할 수 있고, 다시 자식은 자식 데이터를 포함할 수 있습니다.
{
  name: "Parent",
  children: [
    {
      name: "Child 1",
    },
    {
      name: "Child 2",
      children: [
        {
          name: "Grandchild 21",
        }
      ]
    }
  ]
}
자식 관점에서 부모는 하나만 가질 수 있습니다.
따라서 부모를 가리키는 포인터 형태로 구현하여 , 배열 형태로도 자료구조를 표현할 수 있습니다.
[
  {
    id: "parent-1",
    name: "Parent",
    // references to children via their IDs
    children: ["child-1", "child-2"]
  },
  {
    id: "child-1",
    // reference to the parent vid its ID
    name: "Child 1",
    parent: "parent-1"
  },
  {
    id: "child-2",
    name: "Child 2",
    parent: "parent-1",
    children: ["grandchild-2"]
  },
  {
    id: "grandchild-21",
    name: "Grandchild 21",
    parent: "child-2"
  }
]
사용 사례 : 중첩 객체를 이용한 컴포넌트 재귀 렌더링
아래와 같은 중첩 메뉴와 같은 형태의 UI에 적용하면 좋습니다.

중첩 자료구조 형태는 읽기 쉽고 간단하지만, 사실 데이터 업데이트가 쉽지 않습니다.
특히 불변 개념을 유지하려면 더욱 그렇습니다.
대안은 위의 중첩 객체 대신 플랫한 배열을 사용하는 것입니다.
ID 참조를 해결해야 하므로 로직이 좀 더 필요합니다만,
대신 객체와 상호 작용하기 쉽고 백엔드에서 처리하기도 쉽습니다.
자료구조를 아래와 같이 정규화 합니다.
- 이제 children을 아이디로 참조합니다.
- 아이템의 중첩구조가 제거되었습니다.
const menuItems = [
  {
    id: "1",
    text: "Menu 1",
    children: ["11", "12"],
    isRoot: true
  },
  {
    id: "11",
    text: "Menu 1 1",
    href: "#11"
  },
  {
    id: "12",
    text: "Menu 1 2",
    href: "#12"
  },
  {
    id: "2",
    text: "Menu 2",
    href: "#2",
    isRoot: true
  },
  {
    id: "3",
    text: "Menu 3",
    children: ["31"],
    isRoot: true
  },
  {
    id: "31",
    text: "Menu 3 1",
    children: ["311"]
  },
  {
    id: "311",
    text: "Menu 3 1 1",
    href: "#311"
  }
];
루트 컴포넌트로 렌더링을 시작합니다.
아이디로 객체를 조회할 수 있도록 객체 맵({[key:string]:Item})을 만듭니다.
function NestedMenu() {
  const itemsById = menuItems.reduce(
    (prev, item) => ({ ...prev, [item.id]: item }),
    {}
  );
  const rootIds = menuItems.filter(({ isRoot }) => isRoot).map(({ id }) => id);
  return <Menu itemIds={rootIds} itemsById={itemsById} />;
}
id 를 이용해 객체 맵에서 인덱싱 할 수 있도록 MenuItem 컴포넌트에 전달합니다.
function Menu({ itemIds, itemsById }) {
  return (
    <ul>
      {itemIds.map((id) => (
        <MenuItem key={id} itemId={id} itemsById={itemsById} />
      ))}
    </ul>
  );
}
MenuItem는 아이디 prop을 이용해 객체 map에서 아이템을 꺼내 렌더링 합니다.
function MenuItem({ itemId, itemsById }) {
  const item = itemsById[itemId];
  if (!item.children) {
    return (
      <li>
        <a href={item.href}>{item.text}</a>
      </li>
    );
  }
  return (
    <li>
      {item.text}
      <Menu itemIds={item.children} itemsById={itemsById} />
    </li>
  );
}
참고
https://profy.dev/article/javascript-data-structures
Data Structures In Frontend JavaScript In The Real World (With React Code Examples)
Never seen a linked list in frontend JavaScript code? Me neither. But here are real-world examples of data structures Map, Set, Stack, Queue, and Tree.
profy.dev
'FrontEnd' 카테고리의 다른 글
| Refactoring React(리팩토링 리액트) : Folder Structure(폴더 구조) (2) | 2023.02.24 |
|---|---|
| Refactoring React(리팩토링 리액트) : Conditional Rendering(조건부 렌더링) (0) | 2023.02.23 |
| Refactoring React(리팩토링 리액트) : useState (0) | 2023.02.23 |
| styled-components와 flexbox를 이용한 2D 레이아웃 디자인 (0) | 2023.02.19 |
| styled-components best practices(모범 사례) (0) | 2023.02.17 |


