Mobx를 통해 반응형 프로그래밍(reactive programming)의 원리에 대해 알아봅니다.
MobX는 반응형 프로그래밍을 투명하게 적용하여 상태 관리를 간단하고 확장할 수 있는 실전에서 증명된 라이브러리입니다.
Functional Reactive Programming
// Pure function
function result(a, b){
  return a + b
}
result(3,5);
// Impure function
const c = 6;
function result(a,b){
   return a + b + c;
}
result(3,5)반응형 프로그래밍은 부작용을 제어하는 것입니다.
스프레드시트에서 변수는 셀입니다. 스프레드시트의 셀이 변경되면 해당 셀을 참조하는 모든 셀도 변경됩니다.
Passive Programming Vs Reactive Programming

Car.prototype.turnKey = function() {
  this.engine.fireUp();
}
Engine.listenToKey = function(car) {
  car.onKeyTurned(() => {
    this.fireUp();
  });
}
The Observer Pattern
이 패턴엔, 구독한 리스너 목록을 유지하는 Producer가 있습니다.
생산자의 상태가 변경될 때마다 Listener에게 알림이 전송됩니다.
function Producer(){
 this.listeners = [];
}
Producer.prototype.add = function(listener){
 this.listeners.push(listener);
}
Producer.prototype.remove = function(listener){
 var index = this.listeners.indexOf(listener);
 this.listeners.splice(index,1);
}
Producer.prototype.notify = function(message){
 this.listeners.forEach(function(listener){
  listener.update(message);
})
}
var listener1 = {
 update: function(message){
  console.log('message')
 }
}
var notifier = new Producer();
notifier.add(listener1);
notifer.notify("Hello World");
Observable
var source = Rx.Observable.fromEvent(document.body, 'mousemove');
source.subscribe(val => console.log(val),
e => console.log(e),
() => console.log('completed')
);
source.subscribe(val => {
console.log(`x: ${val.offsetX} & y: ${val.offsetY}`)
},
e => console.log(e),
() => console.log('completed')
);우리는 일련의 mousemove 이벤트의 옵저버블을 생성할 수 있으며
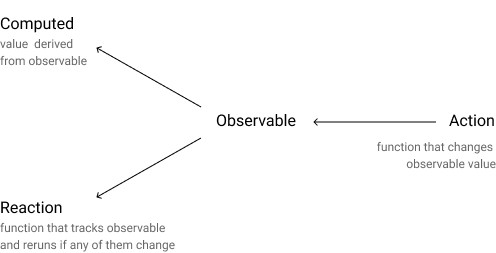
Mobx
애플리케이션 상태에서 파생될 수 있는 모든 것은 파생되어야 합니다. 자동으로.


const { observable, autorun } = require("mobx");
const todoStore = observable({
/* some observable state */
  todos: [],
  /* a derived value */
  get computedCount() {
    return this.todos.filter((todo) => todo.completed).length;
  },
});
/* a function that observes the state */
autorun(function () {
  console.log(
    `Completed ${todoStore.computedCount} of  ${todoStore.todos.length}`);
});
/* ..and some actions that modify the state */
todoStore.todos[0] = {
  title: "Take walk",
  completed: false
};
// synchronously prints 'Completed 0 of 1 items'
todoStore.todos[0].completed = true;
// synchronously prints 'Completed 1 of 1 items'
1. 상태를 정의하고 관찰 가능하게 만들기


참고:
Build your own MobX-like state management library in 40 lines of code
Build your own MobX-like state management library in 40 lines of code.
czaplinski.io
2. 파생(derivation) 처리
위의 예에서 계산된 값은 영향을 주는 값이 변경되면 상태에서 자동으로 파생됩니다.
3. action을 이용해 상태 변경
4. 부수 효과 다루기
예제에서 스토어 업데이트의 부수 작용은 autorun 메서드 내에서 수행됩니다.
autorun 메서드는 스토어 값이 업데이트될 때마다 자동으로 실행됩니다.
Redux와의 차이점
- 불변 저장소를 구현합니다.
- redux의 액션은 저장소를 변경할 책임이 있습니다.
- 리듀서는 모든 상태가 변경될 때마다 항상 새로운 상태를 반환하는 순수 함수입니다.
- 데이터 변경 전파를 이용해 변경 가능한 저장소를 구현합니다.
- 액션은 스토어를 변경할 책임이 있습니다.
- 그러나 저장소는 작업 없이 직접 변형될 수도 있습니다.
- MobX는 관찰 가능한 변경 가능한 데이터 구조를 따라 상태 생명 주기를 구현하고 변경 사항을 추적합니다.
참고 :
The Principles Behind MobX and Reactive Programming
MobX is a battle tested library that makes state management simple and scalable by transparently applying functional reactive programming.
levelup.gitconnected.com
'FrontEnd' 카테고리의 다른 글
| Redux Toolkit : Usage Guide(사용 가이드) (0) | 2022.09.13 |
|---|---|
| Redux Toolkit : Immer와 함께 사용하기 (0) | 2022.09.12 |
| [30초 CSS] CSS 속성 상속과 !important는 무관하다 (0) | 2022.09.02 |
| 리액트 쿼리 : 셀렉터와 폴더 구조 (0) | 2022.08.30 |
| [번역] Idiomatic Redux: The Tao of Redux, Part 2 - Practice and Philosophy (0) | 2022.08.28 |


